With Risika's advanced filtering, you can create lead lists that don't just have growth potential, but also the necessary creditworthiness. Follow this guide to master the tool in just a few minutes.
Table of Contents
- Video Walkthrough
- Step 1 - Start your search
- Step 2 - Select your filters
- Step 3 - Enter values and refine the list
- Step 4 - Export your leads
- Step 5 - Choose columns and information
- Step 6 - The final result
Video Walkthrough
Want to see the process in practice? Watch this short video where we go through all the core functions of the filtering module.
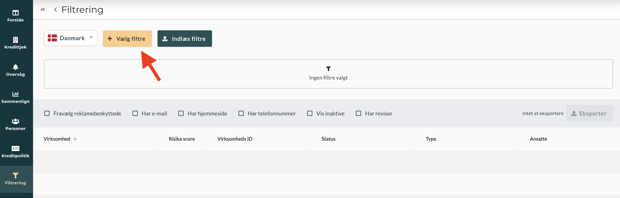
Step 1: Start your search
Go to the filtering module in the menu and click the "Select filters" button to open the overview of search criteria. This is where the foundation for your segmentation is laid.
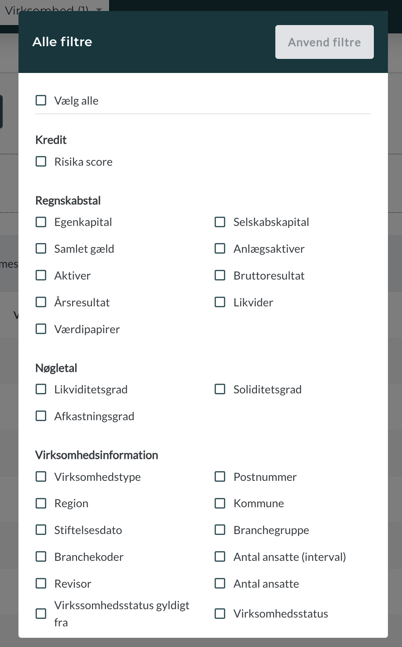
Step 2 - Select your filters
You have access to over 25 different filters. Here, you can segment companies based on everything from specific industries and geographic regions to complex financial key figures. Select the parameters that define your ideal customer profile.
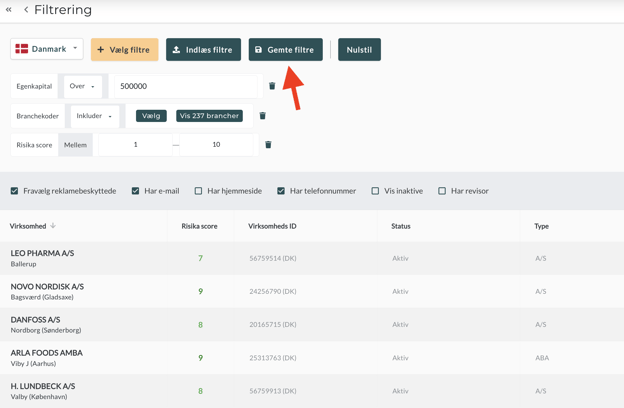
Step 3 - Enter values and refine the list
Now you need to set the parameters for your chosen filters. As soon as you enter values, the list updates automatically with relevant companies. For example, you can filter by:
-Equity: Set a minimum limit (e.g., over DKK 500,000).
-Industry code: Select specific industries via "Select".
-Risika Score: Target your search toward healthy companies (e.g., score 1-10).
Pro tip: Use the "Exclude" function to remove unwanted segments. You can also sort specifically for companies with direct contact info (email/phone) or opt out of those that are advertising-protected (Robinson list). Remember to click "Save filters" at the top if you want to reuse the setup later.
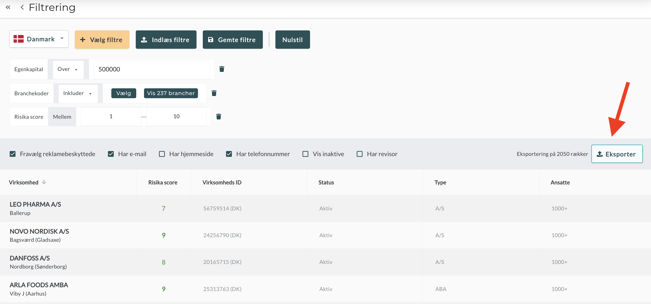
Step 4 - Export your leads
Once your list is ready, the data needs to be transferred to your CRM system or sales list. Click "Export" on the right side and choose your preferred format (.xlsx or .csv).
Step 5. Choose columns and information
You decide which data to include in your export file. Select the specific information your sales team needs (e.g., decision-makers, direct emails, or annual results). Name your export profile at the bottom so you can easily use the same structure next time.
Step 6 - The final result
Your file is now ready for use, structured in clear columns based on your choices. You can now begin your sales efforts with peace of mind, knowing that the data is both up-to-date and valid.

Need help with segmentation?
Do you have questions about individual filters, or do you want sparring on how to best reach your target audience? Our team is ready to help you get started.
Email: support@risika.com
Live chat: Find us directly in the bottom right corner of the platform.